Stack focus, which is also often referred to as focus stacking, is a technique that produces close-up images of depth and detail beyond that seen in conventional close-ups.
The technique of focus stacking allows you to enhance the depth of field in an image by taking a series of photos and generating a composite image consisting only of the areas that are in focus. Although dedicated focus-stacking software has been around for a while, the hard part was getting suitable high-quality image files.
Specifically, what was difficult was taking a series of photos while changing focus a small, fixed amount with each photo. Another challenge, unless you finished shooting quickly, was the fact that the light would change, resulting in photos that were not suitable for focus stacking. This is precisely the sort of difficulty Nikon’s “Focus Shift Shooting” feature, which automatically varies focus by a set amount over a set number of photos, was designed to solve.
When it comes to focus stacking, it might seem natural to ask, ‘Why go to all that trouble when you can just stop the aperture all the way down?’ but it’s not that simple. To achieve the equivalent deep depth of field using only the aperture setting, you would have to stop the aperture down to values very close to the minimum f-stop value of the lens and stopping the aperture down increases diffraction, resulting in pictures that lack definition.
In these circumstances, the way to get good depth of field without stopping the aperture down so far that pictures lose definition is by focus stacking.

Focus step width: 1
Number of shots: 36 (taken with the D850) | 
Focus step width: 2
Number of shots: 11 (taken with the D850) |
Creating focus stacking photography
Nikon's “Focus Shift Shooting” feature*1 combines photos shot at different focus positions into a single image with increased depth of field. When shooting is complete, you can copy the photos to a computer and use third-party focus-stacking software to combine the areas that are in focus into a single image.
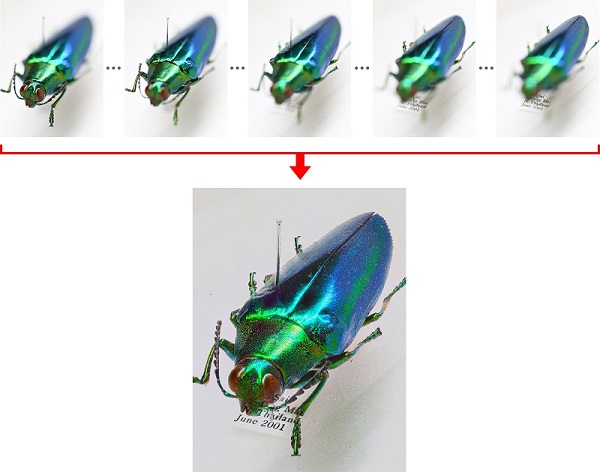
The camera takes a series of photos (150 in this example), which are used to create a composite image containing only the areas that are in focus.
Adjusting Settings
To adjust focus shift settings, go to the Photo Shooting Menu and select Focus shift shooting*1. The options available include No. of shots, Focus step width, Interval until next shot, First-frame exposure lock, Silent photography and Starting storage folder (with sub-options of New folder and Reset file numbering), but the ones with the greatest influence on how focus stacking turns out are Focus step width and No. of shots.
Although they aren’t on the menu, other important factors are the aperture and the starting focus position.
Aperture
Because we don’t need to worry about getting a deep depth of field with a single photo, we can instead consider how aperture can be adjusted to produce a high-resolution image with each photo. Specifically, we need to think about the aperture at which the lens performs best. If diffraction were our focus, it could be minimized by shooting at maximum aperture, but, given the characteristics of the lens, a setting two to three stops lower, say f/4 to f/8, is generally the best option.
Starting focus position
Using focus shift, the camera takes a series of photos starting from a selected focus position and continuing toward infinity. Choose a starting focus position either at or slightly in front of the closest point of the section of the subject that is in the desired depth of field. The camera automatically stops shooting once it reaches infinity, even if it has not reached the number of shots selected.
Focus step width
You have a choice of ten focus step widths, ranging in value from 1 to 10. The amount the focus distance changes with each photo is not determined solely by the focus step width but is calculated by the camera based on a variety of lens data, including focal length and aperture, so it’s probably best to experiment until you achieve the desired results.
The mistake people make in choosing the focus step width is to pick one so large that some areas in the focus-stacked image are out of focus. To prevent this, a focus step width of 5 or less seems safe.
Focus shift photography itself is very easy and there is no need to worry about taking too many photos, so you can even choose a focus step width of 2 or 3 for images you want to print at a large size.
Number of shots
The number of shots can be set to values between 1 and 300. You’ll generally need over one hundred photos to cover the desired field depth when photographing an insect or other small object using macro photography at the settings described above, namely an aperture of f/5.6 and a focus step width of 2 or 3. On the other hand, to cover a landscape starting close to the camera and extending into the distance, you may only need to take a few photos, particularly if you're using a wide-angle lens, as the depth of field of each of the individual photos will already be quite deep.
Focus-Stacking Software
The focus-stacking process begins post-shooting with image selection. Each sequence will no doubt contain extra photos you took just in case but that were not shot at the focus distances needed for focus stacking. Use software such as Nikon’s NX Studio to view the photos and select the files you want from each sequence.
Focus stacking is generally performed using Adobe Photoshop or other generic image-processing software or dedicated stacking software such as Helicon Focus from Helicon Soft or Zerene Stacker or Combine ZM from Zerene Systems. Note that Nikon neither endorses this software nor guarantees its operation.
For further suggestions on settings and focus shift tips, please contact Nikon Customer Support.
*1 Available in selected Nikon cameras, please consult the User’s Manual of your camera.